Unleash SharePoint Extensibility using SharePoint Framework and MutationObserver API
Unleash SharePoint Extensibility using SharePoint Framework and MutationObserver API
Why Monitoring DOM changes?
Monitoring for changes to the DOM is crucial in modern web applications and frameworks, especially when extending SharePoint functionalities. This article will guide you through the effective use of the MutationObserver API, providing insights into observing DOM changes effortlessly and responding dynamically. Understanding and harnessing MutationObserver is key to unlocking the full potential of SharePoint extensibility.
Monitoring changes of the DOM is sometimes needed in complex web apps and frameworks. this article will show you how you can use the MutationObserver API to make observing for DOM changes relatively easy and respond to changes by extending SharePoint functionalities.
MutationObserver
MutationObserver is a built-in object that observes a DOM element and fires a callback when it detects a change.
Subscriber
Subscriber is to Subscribe to changes. The Subscriber is important to observe for changes. This is a function that will be called every time something changes in the DOM.
1
2
3
4
5
6
7
8
9
function subscriber(mutations) {
  console.log(mutations);// [...]
  console.log(mutations.constructor);// Array

  mutations.forEach((mutation) => {
    console.log(mutation); // {...}
    console.log(mutation.constructor); // MutationRecord
  });
}
Asynchronous
So why do we get an array instead of a single MutationRecord. The answer here is that MutationObserver works asynchronously. For example, if you change three items in the DOM at the same time — the subscriber will be called only once, but with three mutations, and each will represent each change you made. But if these elements change at different times, for example, with 1 second delay, the subscriber will be called three times with one mutation each time.
MutationObserver constructor
To create an instance of observer, we need to create it using the MutationObserver constructor with one parameter — the subscriber function. But the code above will not immediately observe our document. For this to work, we have to do three more things. Let’s do it step by step to achieve our goal.
1
2
3
4
5
6
7
8
9
10
11
12
13
// create subscriber
function subscriber (mutations) {
  mutations.forEach((mutation) => {
    console.log(mutation);
  });
}

// create observer
const observer = new MutationObserver(subscriber);
// observer methods
for (const prop in observer.__proto__) {
  console.log(prop); // observe, disconnect, takeRecords
}
Target element
The target element can be any DOM node. If you only want to monitor changes on a particular item, you can select it using the regular getElement(s)by…, querySelector or whatever you use. If you want to monitor changes to the entire document, you can specify target as just a document.
1
2
3
4
const target1 = document; // correct
const target2 = document.body; // correct
const target3 = document.getElementById('blockId'); // correct
const target4 = window; // wrong
Config
Now it’s time to configure it! Here is an important step that we cannot ignore because otherwise the entire observer will not work. Why config is so important? It indicates what the observer should look for and what we will then get in the subscriber.
Here’s what a config object looks like with all its properties.
1
2
3
4
5
6
7
8
9
10
11
12
13
14
15
16
// by default all false
// you can pick as many as you want, but at least one of - attributes, characterData, or childList
const observerConfig = {

  attributes: true, // attribute changes will be observed | on add/remove/change attributes
  attributeOldValue: true, // will show oldValue of attribute | on add/remove/change attributes | default: null

  characterData: true, // data changes will be observed | on add/remove/change characterData
  characterDataOldValue: true, // will show OldValue of characterData | on add/remove/change characterData | default: null

  childList: true, // target childs will be observed | on add/remove
  subtree: true, // target childs will be observed | on attributes/characterData changes if they observed on target

  attributeFilter: ['style'] // filter for attributes | array of attributes that should be observed, in this case only style

};
By default, all configuration properties are set to false, and without specifying any of them, you get an error when you try to create an observer. Because observer should know what type of mutations you are looking for.
You can choose as many configuration properties as you want. But at least you have to specify one of — childList, attributes or characterData should be set to true. If you don’t know what CharacterData is, you can read about it on MSDN. In short, in most cases it’s — text nodes.
Observe
Finally, to observe the changes, we need to call observer with the observe method, which takes two parameters — target element and config.
1
2
3
4
5
6
7
8
9
10
11
12
13
14
15
16
17
18
19
20
21
22
23
24
25
26
// target element that we will observe
const target = document.body;

// config object
const config = {
  attributes: true,
  attributeOldValue: true,
  characterData: true,
  characterDataOldValue: true,
  childList: true,
  subtree: true
};

// subscriber function
function subscriber(mutations) {
  mutations.forEach((mutation) => {
    // handle mutations here
    console.log(mutation);
  });
}

// instantiating observer
const observer = new MutationObserver(subscriber);

// observing target
observer.observe(target, config);
The code above is sufficient to find changes to the DOM, such as adding or removing new nodes, adding/modifying/deleting attributes, and modifying text data. Thus, we can observe changes in our document completely.
But there is another important thing — we need to understand the data that we receive in the subscriber.
MutationRecord
It’s time to take a look at the mutation object we’re getting. As mentioned earlier, it has its own MutationRecord constructor.
1
2
3
4
5
6
7
8
9
10
11
MutationRecord = {
  addedNodes : [], // NodeList
  attributeName : null, // attribute name - string or null
  attributeNamespace : null, // attribute namespace
  nextSibling : null, // next sibling in DOM
  oldValue : null, // old value
  previousSibling : null, // previous sibling in DOM
  removedNodes : [], // NodeList of removed nodes
  target : Element, // target element
  type : "childList" // mutation type one of childList, attributes or characterData
}
MutationRecord will always contain all of its 9 properties, but if you do not specify some of them in config, these values will be null.
Disconnect and TakeRecords methods.
Now let’s look at two more methods that the observer has.
Disconnect method
1
2
3
4
5
6
simply stops the observer from getting any mutation events. TakeRecords method empties the instance of the observer and returns the records.
// stop observing
observer.disconnect();

// empties observer instance and returns records
observer.takeRecords(); // -> MutationRecords
Example
1
2
3
4
5
6
7
8
9
10
11
12
13
14
15
16
17
18
19
20
21
22
23
24
25
// Select the node that will be observed for mutations
const targetNode = document.getElementById("some-id");

// Options for the observer (which mutations to observe)
const config = { attributes: true, childList: true, subtree: true };

// Callback function to execute when mutations are observed
const callback = (mutationList, observer) => {
  for (const mutation of mutationList) {
    if (mutation.type === "childList") {
      console.log("A child node has been added or removed.");
    } else if (mutation.type === "attributes") {
      console.log(`The ${mutation.attributeName} attribute was modified.`);
    }
  }
};

// Create an observer instance linked to the callback function
const observer = new MutationObserver(callback);

// Start observing the target node for configured mutations
observer.observe(targetNode, config);

// Later, you can stop observing
observer.disconnect();
Now, after we understand the MutationObserver, Let’s implement it in a SharePoint Framework SPFx extension to extend the SharePoint Header by adding an additional button that opens a panel.
Getting Started with SharePoint Framework and SPFx Extensions
The SharePoint Framework (SPFx) is a page and web part model that provides full support for client-side SharePoint development, easy integration with SharePoint data, and extending Microsoft Teams and Microsoft Viva. With the SharePoint Framework, you can use modern web technologies and tools in your preferred development environment to build productive experiences and apps that are responsive and mobile-ready. To get started to SPFx extensions, I got you covered.
Real implementation on SharePoint Online
Have you ever thought about adding action button in the SharePoint right side of a site header like “Create”, “following” and “Share” site buttons. Have you ever thought that it’s possible. Yes, it is possible with MutationObserver.
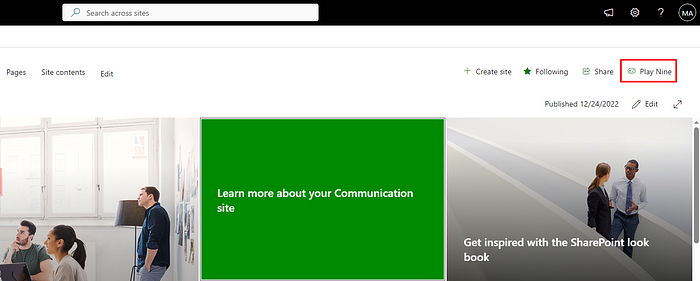 Screenshot1 — Fluient UI ActionButton that opens a Fluient UI Panel.
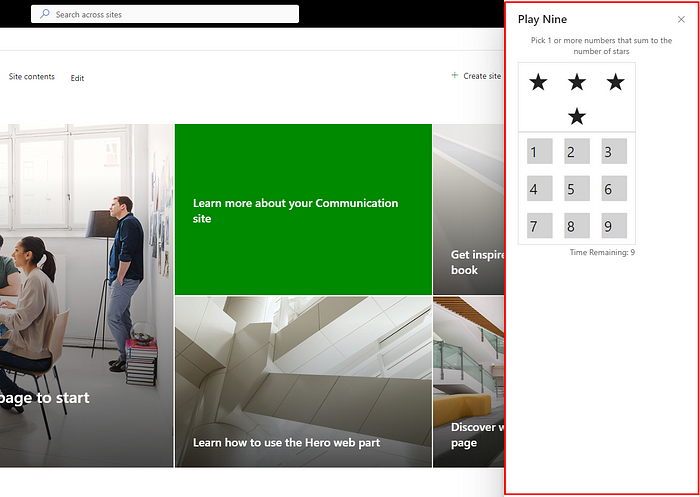 Screenshot2 — Fluient UI Panel that contains a form for playing PlayNine game.
If you inspect the SharePoint online site main header, you will find a div element with this class “actionsWrapper-xxx”. Monitoring the div element that has this class “actionsWrapper-xxx” monitoring its child elements could be a way to add additional action button as an additional child in the container div element.
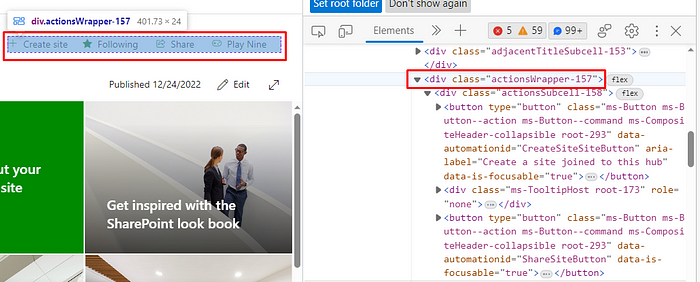 Screenshot3 — Inspecting right side of the a SharePoint site Main Header
I assume that you created an SPFx extension, and I assume that you have created few handlers in the SPFx extension. We should have these handlers MutationHandler, SharePointPageHandler and a component -In my case, it’s the PlayNine component- that you would like to render once we click on the action button that we are going to add to the site’s main header.
1
2
3
4
5
6
//Call this function from the application customizer file.
public async addMutationObserverForContainerElement(): Promise<void> {
        const element: HTMLDivElement = document.getElementsByClassName(`[class^=actionsWrapper]`);
        //A call to the observer function in the MutationHandler
        this._mutationHandler.observer(element, this._mutationHandler.handleMutation, { childList: true }, []);
    }
1
2
3
4
5
6
7
8
9
10
11
12
13
//SharePointPageHandler//
public AddPlayNineActionButton(parentDivElement: HTMLElement): Promise<void> {
        //creates a div container for the PlayNine action button
        const playNineDiv: HTMLDivElement = document.createElement("div");
        playNineDiv.id = "play-Nine-Container-Id";
       //Append the div container for the PlayNine action button in the container element returened by mutation
        parentDivElement.appendChild(playNineDiv);

       //PlayNineActionButton is a react component contains an action button
        const playNineActionButton = React.createElement(PlayNineActionButton);
        ReactDOM.render(playNineActionButton, playNineDiv);
        return Promise.resolve();
    }
1
2
3
4
5
6
7
8
9
10
11
 //MutationHandler//
 public async handleMutation(mutations: MutationRecord[], ...args: any[]): Promise<void> {
        const divElement = mutations[0].addedNodes[0] as HTMLDivElement;
        await this._sharePointPageHandler.AddPlayNineActionButton(divElement);
        return Promise.resolve();
    }

    public async observer(element: HTMLElement, f: (mutations: MutationRecord[], ...args: any[]) => Promise<void>, config: MutationObserverInit, args: any[]): Promise<void> {
        this._observers.set(element.className, new MutationObserver((mutations) => f(mutations, args)));
        this._observers.get(element.className).observe(element, config);
    }
PlayNine React component
It’s just an Fluient UI ActionButton that opens a Fluient UI Panel as the screenshots 1 and 2 shows. You can implement whatever component you want to render instead of PlayNine component to extend SharePoint functionality.
1
2
3
4
5
6
7
8
9
10
11
12
13
14
//PlayNineActionButton component that is being rendered by SharePoint Handler//
//A snippet of the component that could be rendered//
public render(): React.ReactElement {
        const playNineIcon: IIconProps = { iconName: 'Game' };
        return (
            <div>
                <ActionButton iconProps={playNineIcon} onClick={this.handleOnClickActionButton}>
                    PlayNine
                </ActionButton>
                //Aother component to open a Fluient UI panel on the click of the Action button//
                <PlayNinePanel />
            </div>
        );
    }
Break down the implementation steps into a concise list.
- Call
addMutationObserverForContainerElementfrom the application customizer file. - Create a div container for the action button and observe it for mutations.
- Add an action button (e.g., PlayNine) dynamically in response to observed mutations.
- Implement the action button as a React component within your SharePoint handler.
- Customize the React component to render additional functionalities dynamically.
Conclusion
In conclusion, integrating MutationObserver into your SharePoint development toolkit opens up possibilities for dynamic and responsive user interfaces. By effectively observing DOM changes, you can tailor your SharePoint extensions to provide a seamless and enriched user experience.